What’s your color story?

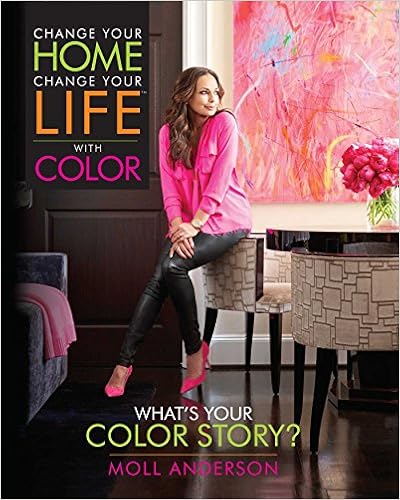
I confessed a little secret of mine over on Instagram the other day. And that is that I am a bit (okay, maybe a lot) insecure when it comes to color. As a quilter, this is an area that I would like to work on and overcome. So when I got the opportunity to get an advance copy of Change Your Home Change Your Life With Color by Moll Anderson–I jumped at it.

Here’s my second confession–I’ve barely started it, but I wanted to share something that came as a bit of an epiphany yesterday when I sat down do dig into it. I sat down with the book, my bullet journal, pencil, and a cup of tea. I had a feeling that I was going to want to jot down some notes as I read.

It turns out that not only does that book have stunning photos and a lot of great information–but it’s a bit of a workbook as well. One of the questions she asks you to examine is what is your favorite color and why. And what is your least favorite color and why. She contends that a lot of our color choices are shaped by our life experiences and it is worth a few minutes to dig a little deeper into those memories.

Picking a favorite color for me is extremely hard. But I just went with my gut on it and wrote down “blue”. Why? I’m not sure–but the word “calm” came to me. I do, in fact, love many, many shades of blue from navy to beachy blues, to the palest of pale blues. The beach house (below) from the show Grace and Frankie is perfectly decorated with many shades of blue (with some pops of orange–blue’s complementary color).

Photo from houzz.com

Photo from houzz.com

In fact, the only think I don’t like about that set is the green dishes–which leads me to my next revelation.

Photo from Hooked on Houses

Photo from Hooked on Houses

For my least favorite color I immediately said “green”. There are many shades of mediumish green that I find repulsive. Then I thought about why and didn’t really know. Then I realized that my house is dripping in green. I have a green sofa, a green chair, I have sage green walls in my bedroom! The bridesmaids dresses at my wedding were forest green! (Very on-trend in 1996, BTW.) Do I really hate green? Obviously not. At least not always. I have come to the realization that I am sick of green.  That’s the real problem here.

The fact that I think I don’t like green and am surrounded by it then lead to the further self-revelation that for all my professed love of blue there is none in my house. Zero. Not a thing. Hmmmm.

Luckily, I have an opportunity to remedy both of these situations very soon. The green sofa I spoke of is leaving soon to be replaced by a new, neutral sofa. I would love to take this opportunity to lighten up what is a quite dark room in my home with not only a lighter sofa, but maybe even a lighter rug and ottoman–what I currently have in that room is very green/burgundy (also very on-trend circa 1996). Here is my opportunity switch things up with some blue throw pillows and… I’m not even sure yet–but my mind has been opened.

I still have quite a bit of the book to explore, but–I can’t wait to find out the next chapter in my color story.

My favorite hand piecing tools

patchwork-along-blocks

Six blocks down for the Fat Quarter Shop’s Patchwork Quilt Along. I finished them in about a week and a half and I can only hope that I can maintain that pace for a whole year. I am actually a bit sad that they are done and I don’t get the next pattern until next month. My hands feel so idle in the evenings now, while we have our family TV time. Yes, I have things to knit–but I’m a little obsessed with hand sewing right now.

As I mentioned in my last post–I made just about every mistake you could make with the first few blocks. As I continued with the next three, I’ve been experimenting with a few things (especially needles) and I have arrived at a few of my favorite tools.

hand-piecing-tools

Perhaps most importantly, I have found what I think is the perfect needle: Piecemakers Hand Applique Sharp size 12. It is thin enough to have little to no drag on the fabric, an eye that is not impossible to thread (though I do use a very simple needle threader–the red square in the picture), and is a very nice length. I also like the Betweens from the same maker, but I find them a bit short–they don’t hit my thimble in the right place.

Speaking of thimbles, I’ve had this one for forever. I’ve tried all kinds of thimbles and this simple metal one that you can buy at any craft store (probably Dritz brand) is my favorite. Fun fact: I like this size now, but I have a smaller one that works better when I’m a bit thinner.

After making all the marking mistakes early on, I am now marking with a thin, mechanical pencil using the Jinny Beyer Perfect Piecer. Yes, you can use any old ruler, but this one has all the right markings and one day I hope to graduate to just being able to mark the dots and not the whole line–and this one has perfect little holes for that.

Everything else is pretty self-explanitory: my favorite Aurifil 2311 50 wt. thread, a small pair of sharp scissors, some nice thin pins, and the ever present red Clover clips to keep things together and organized.

patchwork-blocks

I keep all of this in a little zipper pouch that a wonderful friend made me and I am ready to make the most of “found” moments throughout my day. Most recently, I did a bit of hand piecing in a hotel hallway, waiting for my son to perform with his Jazz Honor Band. Small moments, big results.

is this crazy? a handpieced quilt project

hand-pieced-quilt-blocks

This may be crazy. And I may totally fail. But I hope not.

Ever since I learned to quilt, about seven years ago, I’ve wanted to make a hand pieced quilt. It seems so portable and charming and fun and a little bit crazy. I’ve hand pieced coasters and mug rugs, but have always been on the lookout for the quilt project that seemed just right. Enter the Fat Quarter Shop Patchwork Quilt Along.

full-quilt

I really had no idea it was going to lead to this, but I love the simple patchwork blocks and clean lines of this quilt and decided, very last minute, to jump on the bandwagon. This pattern has the awesome side benefit of raising money for charity–and I was happy to donate to Make a Wish.

hand-pieced-block

I really didn’t want to buy fabric (but I did), so I started out with some Bonnie and Camille fabric from my stash. I downloaded the pattern, made my donation, and started cutting. These pieces are small! Like 1″ finished squares! I was pondering how careful and accurate I needed to be as I sat down at my sewing machine. Now, my accuracy has been improving steadily these last couple of years, but still. It was then that I realized that this would be a perfect hand piecing project! It ‘s much easier to be accurate when sewing by hand.

hand-pieced-quilt-blocks-2

The blocks are only 5″ and fairly simple. So I stepped away from the machine and got out the needle and thread. I confess, it has been awhile since I did any hand piecing and my skills were quite rusty. Let’s just say I made a few mistakes early on.

The first was that I only marked the seam allowance on the one edge of the fabric that I was going to sew first. Mistake. You are eventually going to sew all four sides of the fabric, so go ahead and mark them all while it is a nice, flat piece of fabric and not all lumpy and bumpy from being sewn to other tiny pieces of fabric.

The second mistake was that I used a Frixion pen to mark the seam allowances. This seemed like a good idea at first, but now that I’ve ironed them, all the marks are gone, and I will want them back when I sew these blocks together. (Forehead smack.)

The third was that I forgot how to get really neat points and corners. The first two blocks are off a bit, but I pulled out my  Quiltmaking by Hand book from hand sewing guru Jinny Beyer, and read up on it. The last block, the red one, came out much better. Progress! I thought about redoing the first two blocks, but they aren’t horrible, and I decided to look at this quilt as my journey in hand piecing. It will be a visible record of my improvement.

I decided that I wanted to use a variety of Bonnie and Camille fabrics for this project, and my stash was not adequate, so I ordered a layer cake of Bonnie and Camille Basics to get a bit more variety. As a matter of fact, I am (im)patiently waiting for the UPS man right now, so that I can get back to it.

To stay up with the Patchwork Quilt Along, you only need to make six blocks a month. It seems pretty do-able–even by hand! I plan to just tackle it one month at a time. It’s amazing how many “found” moments there are in a day to sew a quick seam. It is a goal of mine to use my time more effectively, and using these small moments to stop and hand sew for a bit makes me unreasonably happy.

Anyone else sewing along? I’d love to hear about it!

join me for hibernate :: an online retreat

hibernate

I love Christmastime as much as the next girl, but I will admit to indulging in a big sigh of relief when it’s all over. The holidays can be a lot. A lot of a good–even wonderful–things, but still, a lot.

Which is why treating yourself to an online winter retreat in January is just genius. And exactly what we all need. As it so happens, Heather, over at Beauty that Moves is hosting her self-paced winter retreat called Hibernate in January. I have participated in just about every type of online workshop that Heather has put together (I’m admittedly a bit of a fan girl)–and Hibernate is one of my faves. Here is how she describes it:

Hibernate is a self-paced, four week, online retreat – a place to celebrate the pause that wintertime brings. A place to linger through the dark and quiet, to welcome stillness, and allow time to enjoy home and hearth.

{Sigh} Doesn’t that sound lovely? It does to me too. And you know what else? Heather has asked me to contribute a sewing project to Hibernate! So, if your pot of tea is forever going cold on you–pop on over to sign up because I will show you how to make a tea cozy that fits your teapot perfectly.

There is so much going on during Hibernate–be sure click on over to read all about it. And if you are quick about it–you can invite a friend for free and then each enjoy it for half price! But you need to do that by December 19.

I am looking forward to participating in Hibernate as well (I’ve always wanted to learn how to make soap!) and I hope to “see” you there!


scrappy table runner tutorial

money-shot-1024x681

Scrappy Christmas Table Runner

Size: 12” x 42”

Block size: 6″

Materials

  • 1 ½” strips assorted prints (I used a honeybun of Holly’s Tree Farm from Moda)
  • Background fabric, neutral (I used Kona Snow), cut into 6 7/8″ strips
  • Cotton quilt batting, such as Warm and White
  • 3/4 yd. backing fabric
  • 120″ of 2 1/4″ strips for binding
  • Triangle in a square Bloc Loc ruler, 6″ (optional, but helpful)

Here is an alternate method of making Triangle in a Square blocks, though not at 6″.

Note: All seams are 1/4″

Block Assembly

trim-strip-1024x681

  1. Sew together 7 strips and press the seam allowances all the same direction. Using the triangle template, cut out the first triangle. Continue using the template to cut 14 triangles. Here is a video that shows how to use the Bloc Loc ruler.

trim-sides-1024x681

2. Using the second template, cut the background fabric as shown. You should have 14 sets of 2.

pieces-1-1024x674

3. Lay out the triangle and background pieces as shown.

pieces-2-copy-1024x669

4. Position the background fabric on the left side of the triangle as shown and stitch. Press open.

pieces-4-1024x660

5. Position the remaining background fabric on the right side of the triangle as shown and stitch. Press open.

pieces-5-1024x670

6. Repeat for remaining 13 blocks. You can get some good chaining piecing going by doing Step 4 on all the blocks, pressing, and then Step 5 on all the blocks.trim-2-1024x654

7. Using the Bloc Loc ruler, trim to perfection! The assembly part of this project will go so much smoother when the blocks are are perfectly uniform.

Table Runner Assembly

layout-1-1024x682

layout-2-1024x682

8. Layout blocks as shown and sew them together. Instead of sewing them in rows, I do them as 4-patches and then sew the 4-patches together. I find that I get more accurate nesting seams than if I try to stitch full rows together.

detail-1024x683

9. Baste and quilt as desired. I did some straight line quilting with a walking foot in the background areas only, using Aurifil 2311.  Bind.

detail-2-1024x662

This pattern has so many possible variations! You can use a single print for each triangle, instead of going scrappy. Or you can make the triangle space a neutral fabric and use the prints for the side pieces, for a totally different look. I’m looking forward to playing around with this a bit more and hopefully ending up with a stack of new table runners! And then I will move on to full-size quilts!

Let me know if you make a Scrappy Table Runner! I’d love to see it! Please tag me on Instagram: @kristin_esser.

let’s have a sew along!

sewalong-880x1024

Let’s have a Sew Along! Minki and I love to see all the projects that you have been making from Sew Illustrated. So let’s have a Sew Along so that you guys can share and inspire each other! With prizes of course! The Fat Quarter Shop and Ministry of Fabric have graciously provided awesome prizes.

The rules are simple–here is how it works:

1. Make a project from Sew Illustrated
2. Post it on IG with the hashtag #sewillustratedsal
There will be 3 rounds. Anyone who has entered a project with the hashtag has a chance to win. Enter as many projects as you want.
The end of Round 1 is October 14. We will pick a winner the next day.
 Round 2 is October 15-28.
 Round 3 is Oct. 29- Nov. 11.
You are welcome to enter every round, as many projects as you want!
There will be a Grand Prize Winner at the end of the Sew Along that goes to the person that made the most projects.
That’s it! Let’s get sewing! The sewalong starts now!

yarnalong

img_9519-1024x683

Joining Ginny with Yarnalong today. I just finished reading Harry Potter and the Cursed Child. I didn’t love it and I didn’t hate it. Mostly it was fun to discuss with my daughter, who is a huge Harry Potter fan. She felt similarly, but books that you don’t actually love are usually more fun to discuss anyway.

I’ve got another pair of socks on the needles. I am trying out knitting socks with 9″ circulars. Hmmm. It’s an adjustment! There is just so little area of the needle to work with. I am determined to finish this pair with these needles before I decide whether I will ever use them again. But so far, I prefer dpns. Except that my stitches kept falling off the dps–which is the reason I tried the circs! The stitches never fall off the circs. I’ll get it figured out eventually.

Piecing Makeover Blog Tour and Giveaway

Update: The giveaway is closed and the winner has been notified. Congrats to Marg!

book-cover

Welcome to my stop on the Piecing Makeover blog tour! This book by Patty Murphy is exactly the book that I need at this point in my quilting journey. This book is your guide to diagnosing and solving common quilting problems. I enjoyed reading how the book came to be and it basically contains a lot of information that Patty was passing on to her students as she was teaching–and was a bit surprised that a book like this didn’t already exist! I’m glad that she took matters into her own hands and created this resource to help fellow quilters become better, more accurate, less frustrated piecers.

I for one want to become a super-accurate piecer. It just makes quilting more enjoyable to me to have my blocks go together easily. I don’t plan to get neurotic about it–but sharpening my skills in this area is high on my priority list. So, the second I saw the title of this book, I knew it was a must-have.

First of all, this book is such a great resource. I know that I will refer to it over and over when making certain types of challenging blocks. And I have already picked up so many tips and tricks to improve the methods that I am already using.

Once I started flipping through the book, I headed straight for my nemesis: Flying Geese units. Once I read about her super clever way of piecing flying geese–I knew I had to give it a try. I’m not going to spoil it and walk you through it all here (you have to buy the book for that). But here is a bit of a teaser.

img_9438-1024x683

With one stroke of the rotary cutter, this cute little heart-shaped contraption will become two (2!) flying geese units–created entirely with no pesky bias edges to get all stretched out.

img_9443-1024x683

And then Patty has you trim them to perfection. There was a time when stopping to do this would have driven me crazy, but as I’ve said before, taking the time to trim is absolutely worth it! Your blocks go together like buttah! And here’s the proof. A perfect 4.5″ x 2.5″ unit.

img_9447-1024x674

I have made several quilts with flying geese units before and I’ve always found them tricky to keep consistent. Patty’s method seems to be foolproof, and I will turn to it time and time again in the future, I’m sure of it.

I have an on-going love affair with half square triangles, so I flipped to that section next. I already know the importance of trimming HSTs, but Patty has some great tricks to make sure that you don’t lose any points. I tried those out next and was very happy with the results.

img_9479-1024x683

I have never known how to furl the center seam allowance on a block like this, so that it lays flatter. Patty took care of that. It was my first time, so it’s not great–but it made a big difference in how the front of the block looked. As a matter of fact, I didn’t think my points met until I was able to press it flatter after furling the center. I’m so glad I’ve got that skill up my sleeve now!

img_9482-1024x975

There are many more blocks and skills that I can’t wait to try out–curved piecing, Y-seams, diamonds, and dealing with imperfect blocks (I have a few of those, ahem). So, this book will be within quick reach for a long time.

I cannot abide an orphan block, so I spend a few extra minutes to turn my newly conquered flying geese units into a couple of cute mug rugs. Both of these are made with Amy Sinibaldi’s brand new fabric line from AGF called Playground–that little hopscotch print is perfection!

img_9465-1024x683

img_9467-1024x683

Clearly, this book is a must have resource for every quilter’s bookshelf and C&T Publishing has provided a copy of Piecing Makeover to one lucky winner! Just leave a comment telling me what type of piecing trips you up from time to time. Is it flying geese? Not cutting points off? Tell me all about it!

At the end of the tour, the winners will be announced and C&T will mail a copy of the book to you. Winners outside the U.S. will receive an e-copy. Good luck!

9/12 C&T http://www.ctpub.com/blog/

9/13 AnneMarie Chany http://www.genxquilters.com/

9/14 Jodie Carleton http://vintagericrac.blogspot.com/

9/15 Teri Lucas/Gen Q Magazine http://generationqmagazine.com/

9/16 Sandi Hazlewood http://www.craftyplanner.com/

9/17 Mary Abreu http://confessionsofacraftaddict.com/

9/18 Kristin Esser https://kristinesser.com/

9/19 Me https://pattymurphyhandmade.com/

Let’s have a giveaway!

sundrops

The wonderful Fat Quarter Shop has given me two Sundrops layer cakes by Corey Yoder to giveaway to two lucky winners (1 each). I can’t even tell you how much I love this line! The prints, the color palette! I love it all!

If you love it too, leave a comment telling me what you would make with a layer cake of Sundrops. For more entries, visit my Instagram account, and find the giveaway post to find out how to enter there.

Good luck!

Giveaway ends Thursday, Sept. 15, 2016.

last stop on the sew illustrated blog tour & giveaway!

Sew Illustrated blog tour banner

Well, that was fun! I hope that you have been following along with the Sew Illustrated blog tour. I am in complete awe and amazement at the beautiful projects that were created over the last couple of weeks. Though really I shouldn’t be surprised–this is such a crazy talented group of makers.

To be completely honest, when Minki and I set out to write this book, we weren’t completely sure how it would be received–it was, um, different. But different turned out to be what people are looking for! Since the release of the book and all along this blog tour, I have heard over and over again how people are a little nervous to give sewing illustration a try. But once they do–they are a little amazed that it’s not as hard as they thought. And we keep getting reports of it being a bit addicting. 🙂

So, thank you to everyone that has cheered us on along the way and shared your projects with us on social media! We love to see what you are making, both from the book and just sewing illustration in general. Please tag us and use the hashtags #sewillustrated and #sewingillustration on Instagram so that we can find out what you are making and be inspired by you!

I am also super excited to be able to giveaway a copy of Sew Illustrated to one lucky blog reader! The giveaway will end on September 10, 2016. You can enter below.

Let’s just take one last look at the amazing creations that were featured over the last couple of weeks. Thank again to all the bloggers who shared their talent with us.

Amy at nanaCompany

amy

amy3

Wynn at Zakka Art

wynn

wynn3

wynn2

Sedef at Down Grapevine Lane

sedef

sedef3

Lisa at A Spoonful of Sugar

lisa

lisa2

Amy at chick chick sewing

chick

Stacy at Stacy Olson

stacy2

stacy

Debbie at happy little cottage

debbie

debbie2

Faith at Sarana Ave

faith

faith2

Ayda at  cafenohut

ayda

ayda2

August 26: Melissa at Oh, how sweet

melissa

Jemima at Tied with a Ribbon

jemima

Veronica at Vivid Felicity

veronica

veronica2

Sharon at Lilabelle Lane Creations

sharon2

sharon

Nadra at ellis & higgs

nadra

Kristyne at pretty by hand

krystine

Elnora on Instagram

elnora

elnora4


elnora3

Jennie at Clover and Violet

jennie

Would you like to win a copy of the book? Enter here:  a Rafflecopter giveaway